Category: Lifestyle

  • Walk-in Closet Makeover | Transform Your Closet into a Luxurious Space

    Walk-in Closet Makeover | Transform Your Closet into a Luxurious Space

    Have you ever envisioned your dream closet? Well there is no need to go out a buy a new home. I will give an easy way to transform your walk in closet into a beautiful and luxurious space. If you are looking for a more functional closet space this walk-in closet makeover is a must see. See how I was able to turn my crowded disorganized closet into an open dressing area with lots of storage and style.

    Planning the Transformation

    When, I initially got the vision of how I wanted to transform this hideous Her’s master closet (before pics below) into my dream closet, I thought I would go online and shop for all the different pieces and install them ourselves. However, after we calculated the time it took to measure the space and configure the areas to my liking. I made the decision to have a professional come out and do the installation. I really wanted the closet finished before my birthday, so professional installation was the best choice. The easy way is to hire installers LOL! I’m so glad we did!
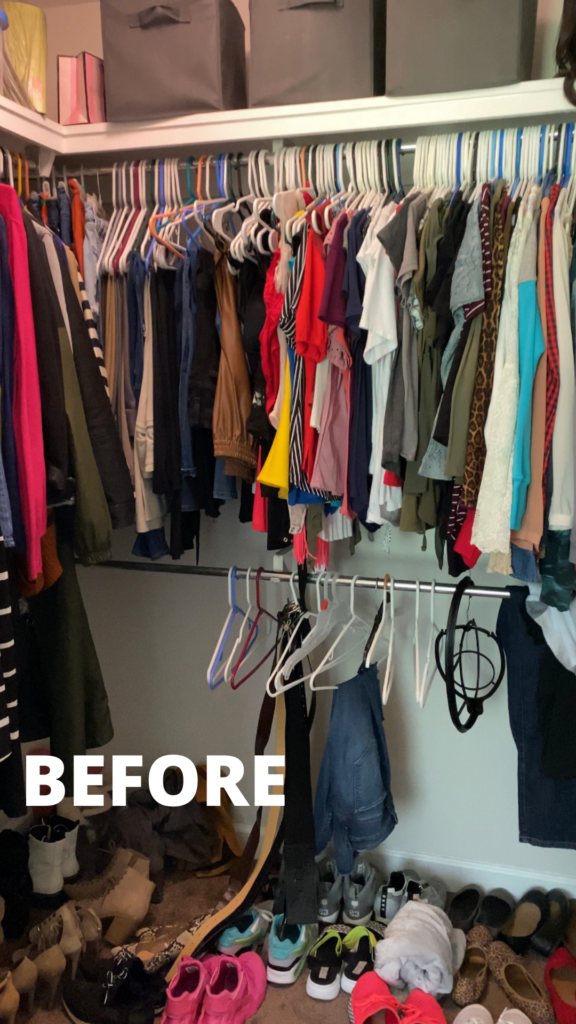
    Before

    The demolition process

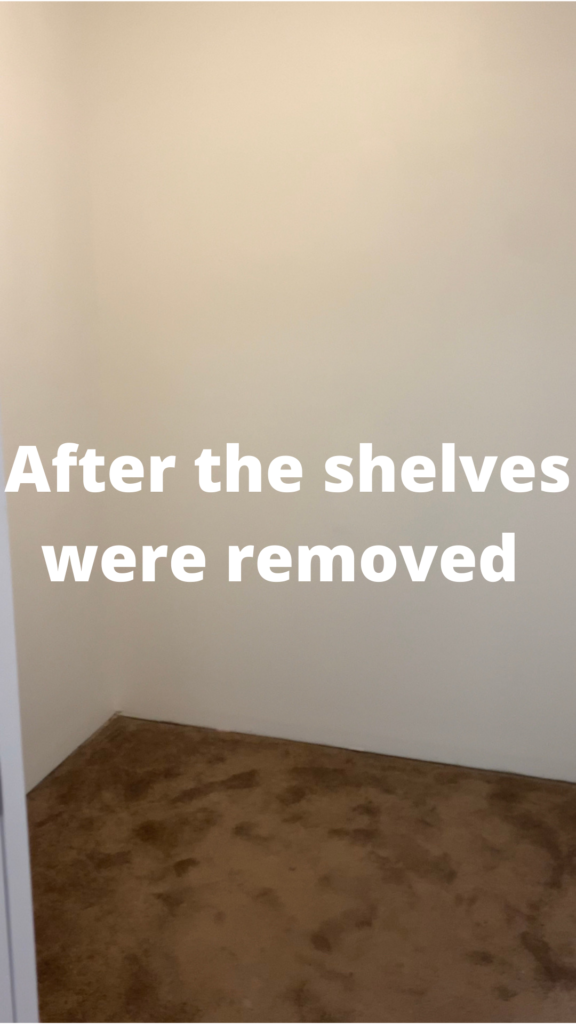
    The professional installers came and removed all the existing shelving units in the closet. I’m not going lie! Once those shelves were removed, I got realllllll NERVOUS! Can you say shook? The walls were terrible! The space had holes and busted drywall everywhere. *Insert me pouting* After, the shelves were carefully removed, the closet space then received repairs to the drywall and a fresh coat of paint. I instantly started to feel better.

    After

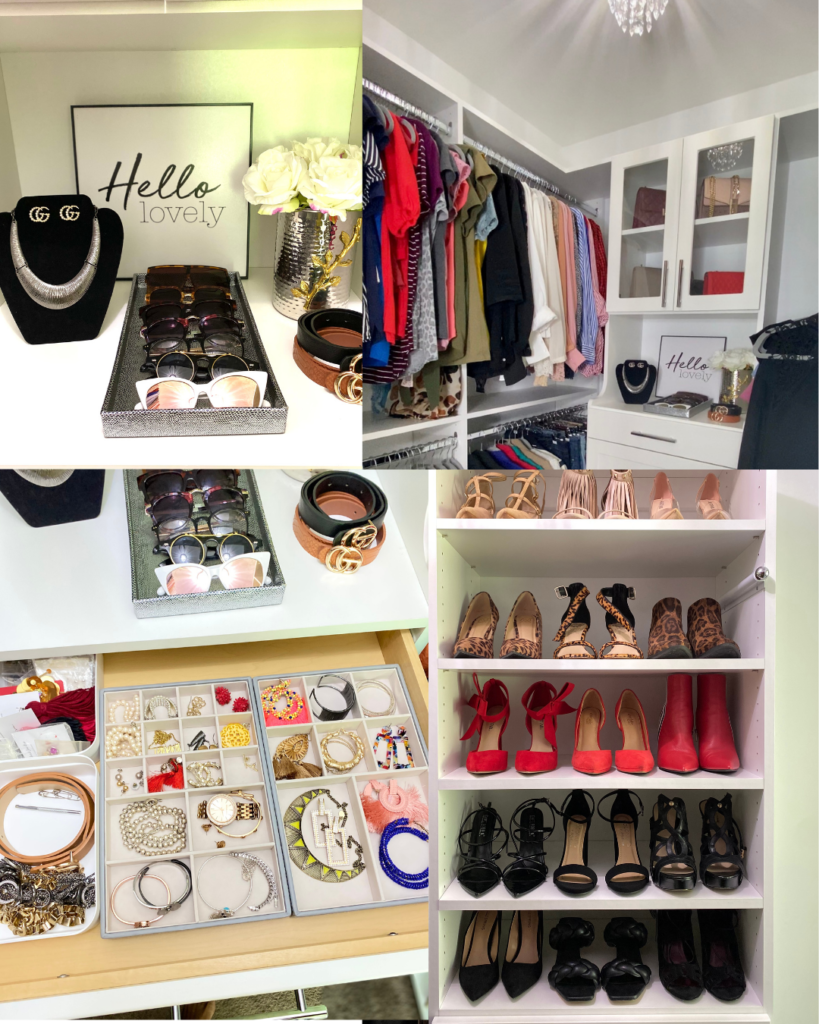
    Once the paint was dry the installers came back in to install the custom closet unit that I designed. The installation was finally complete. Then the decorating fun began!!! We changed out the ugly light fixture with a beautiful crystal chandelier. Next, I changed the hangers on all of the clothes. Then, used the custom drawer organizers in each drawer. Lastly, I added a vase with flowers, wall art, a luxurious sunglass tray and a necklace stand to give the closet a boutique feel. You can purchase all the items I used for this transformation here.

    Finally, the walk-in closet transformation was complete! Can you believe we totally transformed the space in just a day? I can’t either. But I am so happy we did because I love my new luxurious walk in closet. Before, I wouldn’t have even considered it a closet, it was just a deep and cluttered closet. Now it’s an open and very luxurious walk in closet with room for me to actually change in it. This is exactly what I had envisioned for the perfect Her’s master bedroom closet.

    My favorite part of about closet is EVERYTHING! The glass cabinets for my handbags, belt rack, scarf rack, valet, shelves for my shoes, custom trays for my jewelry and a hamper for the dirty clothes are all exactly what I envisioned. I have so many clothes so I needed a beautiful space to keep my wardrobe. Let me know if you ever thought about a closet makeover or have transformed your Her’s master closet into the closet of your dreams. You can also check out my laundry room and bathroom makeovers for more home transformation inspiration.

  • Spring and Summer Makeup Bag Must Haves

    Spring and Summer Makeup Bag Must Haves

    Hey lovelies!!! I’m so excited that it is spring time and I can’t wait for summer! I’m ready for some sand, sun, margaritas and beach fun. To kick off the warmer weather, I thought I would share “What’s in my makeup bag”! If you’re as nosey as I am you’ll love to see my holy grail spring and summer makeup items I tote around with me on the daily! All items are oily skin and black girl friendly. I hope you all enjoy!

    Face Essentials

    1. The Lip Bar’s 3-in-1 Tinted Moisturizer

    We want to keep that skin in tact so we can’t skip the SPF ladies. Just A Tint 3-in-1 Tinted Skin Conditioner with SPF is a sun protector, skin perfector and skin moisturizer all in one. Save yourself some time and grab this 3-in-1 Tinted moisturizer from The Lip Bar. I love that it doesn’t have that sunscreen smell nor does it leave that horrible white cast on your skin. We don’t want to be looking like Casper the Friendly Ghost in our pics ladies.

    2. The Lip Bar Fast Face Kit

    If you are always on the go then this Fast Face Kit is for you. I usually don’t have an hour to spend putting on makeup so this kit is perfect. This easy to use makeup kit is curated by complexion and it comes with foundation, face pallete, brows, eyeliner, mascara and lipstick. Grab your Fast Face Kit here. I absolutely love how simple it is to use this kit.

    Eye Essentials

    3. The Lip Bar Exact Arch Brow Pencil and Quick Draw 2-In-1 Brow Pencil

    I’m not stepping out of the house if my brows aren’t on POINT!!! Let’s face it, brows can make your face pop if the are defined. The Exact Arch brow pencil and the Quick Draw 2-in-1 brow pencil can make maintaining your brows super easy. The Exact Arch brow pencil is beginner friendly and very easy to use. The Quick Draw 2-in-1 Brow pencil is easy and a breeze to fill in your brows. Grab them here.

    4. The Lip Bar Lash Flash Strengthening Mascara

    I love some popping lashes. However, for those of us who do not constantly wear lash extensions and opt for a more natural look, then this Lash Flash Strengthening mascara is for you. It is a superfood mascara infused with Green Tea Extract to condition your lashes while promoting healthier, stronger lashes over time for a longer, healthy-looking set of lashes. The wand is also small so you can coat each lash with mascara. Grab it here.

    Lip Essentials

    5. The Lip Bar Lipsticks and Lip Glosses

    I loveeeeee The Lip Bar’s highly pigmented matte lip glosses and lipsticks. Especially now that we are wearing masks, I need my lipstick to STICK!!! When I realized that The Lip Bar’s matte lipstick doen’t rub off when I put on my mask, I was sold. I love red lipstick so my favorite is “Hot Mama”! Don’t arrive to your destination with your lipstick looks busted and disgusted grab yours today. Grab some here.

    I hope you all enjoyed the low down of what’s in my makeup bag for the Spring and Summer!

    What’s in your makeup bag?

  • How To Successfully Start A Blog

    How To Successfully Start A Blog

    Disclosure: This page contains affiliate links.

    Hey lovelies!!! One question I get asked a lot is how can I start my own blog or website. I want to help as many people I possibly can. So in this post I will be showing you how to Successfully Start a Blog (that makes money) on a budget without any experience. (Including a FREE domain)

    Today, I’m going to talk about:

    • What you will need to start a blog.
    • How to Start a Blog Step-by-Step.
    • What to do after you start your blog.

    When I started my blog in 2020, I honestly had no idea what I was doing. It was so much information to digest and I was totally confused. I knew you could make money blogging but I didn’t know how to make it happen. After tons of research and trial and error, my blog is now properly set up and making money. Now I want to share the tools on how to successfully start a blog. Once I learned how to monetize my blog I made a promise to show others how they could successfully start a blog. I’m going to save you the time and share steps on how to create a blog today.

    What do you need to start a blog?

    Starting a blog is not as scary as it may seem. You don’t need any fancy degrees, skills or a lot of money to start a blog.

    To Start a Blog you are going to need:

    1. An internet connection.
    2. An email address.
    3. A computer.

    If you’re reading this I’m sure you already have an internet connection and who on this planet doesn’t have an email address. However, the reason why I say you need a computer is because following the steps in the post and setting up your blog may be difficult to do at the same time on your phone. Email this link to yourself if you need to come back.

    How do you start a blog?

    I honestly think you can make money blogging about anything if you are determined to do so, so if you want to talk about fashion, fitness or wellness you can do that! I started out talking about everything then I was able to find my target audience and niche down.

    So the way I am going to walk you through blogging doesn’t have you start by picking a topic, instead, I am going to start by talking about choosing a name, then I will walk you through starting your blog.

    Let’s get your blog up and running!

    1. Decide on Blog Name

    It’s time to decide what you want your blog to be called so you can pick out your .com! What should you call your blog? This took me FOREVER to figure out but honestly don’t make it too deep.

    PLEASE NOTE: I highly recommend getting a .com not a .net or a .co because a it’s easier to remember and it looks more professional.

    2. Pick a Hosting Platform

    I initially started my blog on another hosting platform (Please don’t make the same mistake) and the customer service sucked. So from here on out I’ll be telling you how to start your site on BlueHost. Bluehost is great and I would not recommend it If I did not love it so far. Below is my affiliate link and you can get 56% off your blog when you sign up. That being said their customer service is great and I have not had a single issue with my hosting ever since I signed up.

    Bluehost: 

    What you get: 1 free domain, hosting, free WordPress.org installation. 

    • The annual cost for 1 year: $71.40
    • 2 years: $59.40
    • 3 years: $47.40

    Get Bluehost by clicking here.

    Now lets create a blog in just 7 easy steps. This will take around 15 minutes if you know what you want your name to be. 

    Step 1: You are going to go here to bluehost.com. You will come to the Bluehost home screen you are going to click “get started now” on the banner. This will take you to a landing page where you will select the type of plan you want. 

    Step 2: I highly recommend just starting out with the basic plan because you can always upgrade and you do not now know what your future needs will be. Once you know what plan you want click “select” to move on to the signup screen. 

    Step 3: Now enter the name you want in the “new domain” box. If you already bought a domain from a place like GoDaddy then enter that in the “I have a domain name” box. Then click the “next” button. 

    Step 4: In step 4 you are going to create your account. You will type in your information like email and name. This account is where you will sign in to manage all your blog settings such as email, and advertising. So choose an email you use and plan to use when you first start your blog. Then scroll down and move on to step 5. 

    Step 5: After you have finished creating your account scroll down and select your package information. I recommend getting the 3 years or 36 months because you are saving the most money and if you plan to blog for profit you are going to be blogging for a while right? If you cannot afford 3 years right now I recommend just getting the 12 months and upgrading within the year to save money. I recommend not getting the add ons because I have found that WordPress.org has free plugins that do the same thing for you free of charge! 

    Step 6: Select your payment. Then you are on your way! It will take a few minutes for Bluehost to set up your website (around 10) when they are finish setting up your website you will receive an email and be all ready and set to go install WordPress.org!

    Yessssss! You almost have a blog. Exciting right? Super exciting! 

    Installing WordPress.Org 

    Step 7: Find and install the WordPress.org app into your website. Now that you have a website we are going to need WordPress.org in order to turn it into a blog. To start this you have to log in to your new Bluehost account. 

    Once you find the “website” box click the “Install WordPress” icon. Which will bring you to the installation page: 

    • Once you are there click “Install”
    • Then click “Check Domain”
    • After that click “Install Now” 

    Then you will be on your way to blogging! All for the cost of just hosting!

    What to do after you start your blog?

    Now you have successfully started a blog, It’s time for you to install a theme, start writing blog posts, and start sharing those posts on social media! One day I’ll talk about those things but hopefully this was enough to help you get started!