Tag: Lifestyle

  • 4 WAYS TO STYLE BIKER SHORTS

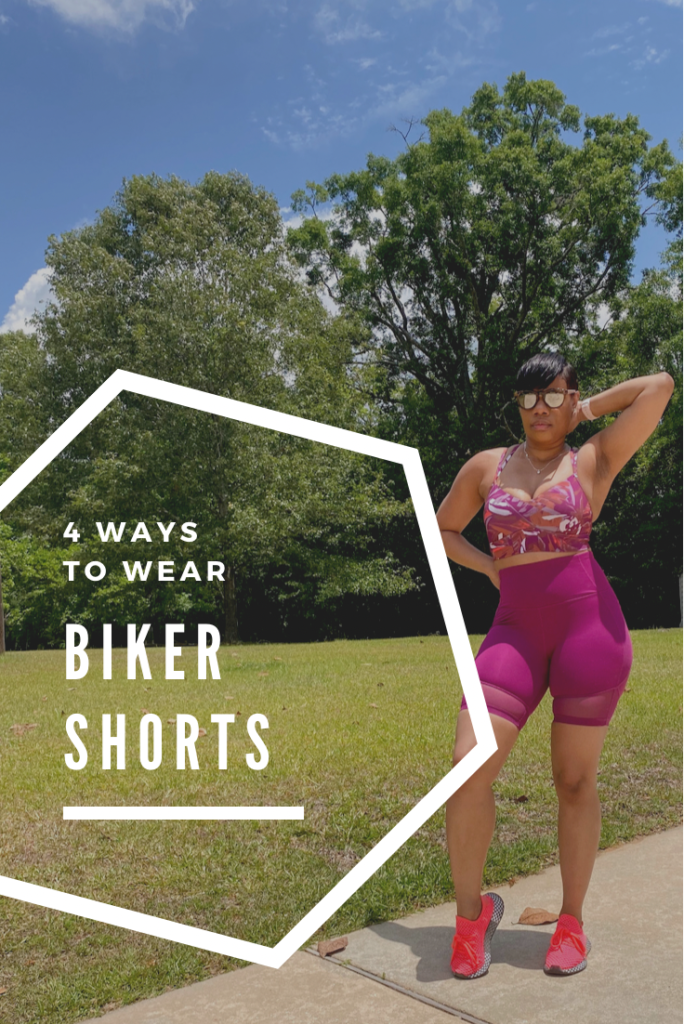
    Biker Shorts have been trending lately. I’m not really a shorts-wearing person but I have recently fallen in love with them. I think that they are perfect for Spring and summer because they’re just as comfy as leggings, but they are shorts. Biker shorts a good way to look cute without putting a bunch of effort into your outfit. I’ll show you 4 different ways to style biker shorts for Spring and Summer. Visit this link for shoppable product details.

    Hope you guys get some new outfit ideas through this post, if you do, leave a comment or let me know on Instagram or Facebook!

    Look #1: Cropped Sweatshirt + Biker Shorts

    This outfit is my favorite. I love cropped shirts and sweatshirts now because I think I’m fine chile. Pair the biker shorts with the cropped sweatshirt, chain bag, sneakers and leopard print glasses. I hope you guys love this one too!

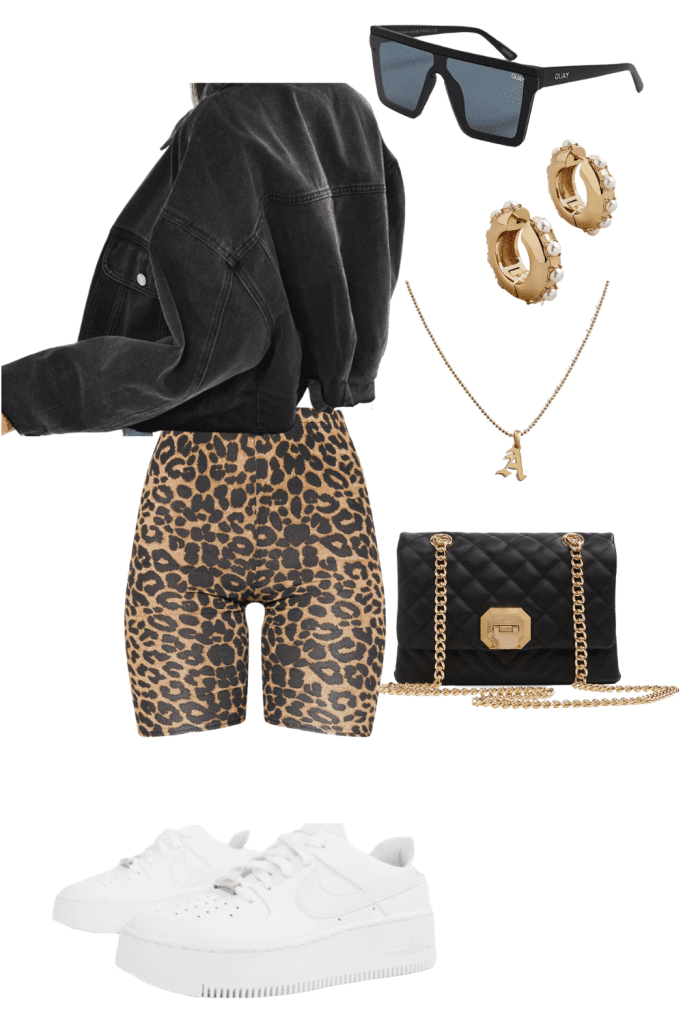
    Look #2: Cropped Jacket + Biker Shorts

    A Cropped denim Jacket and Biker shorts is a great look! For Spring, I would chose a cropped denim jacket with gold accessories.

    Look #3: High Neck Bra & Biker Shorts

    This is for fashion/athletic look. The orange bra gives it a pop of but it also comes in black if you want to tone it down.
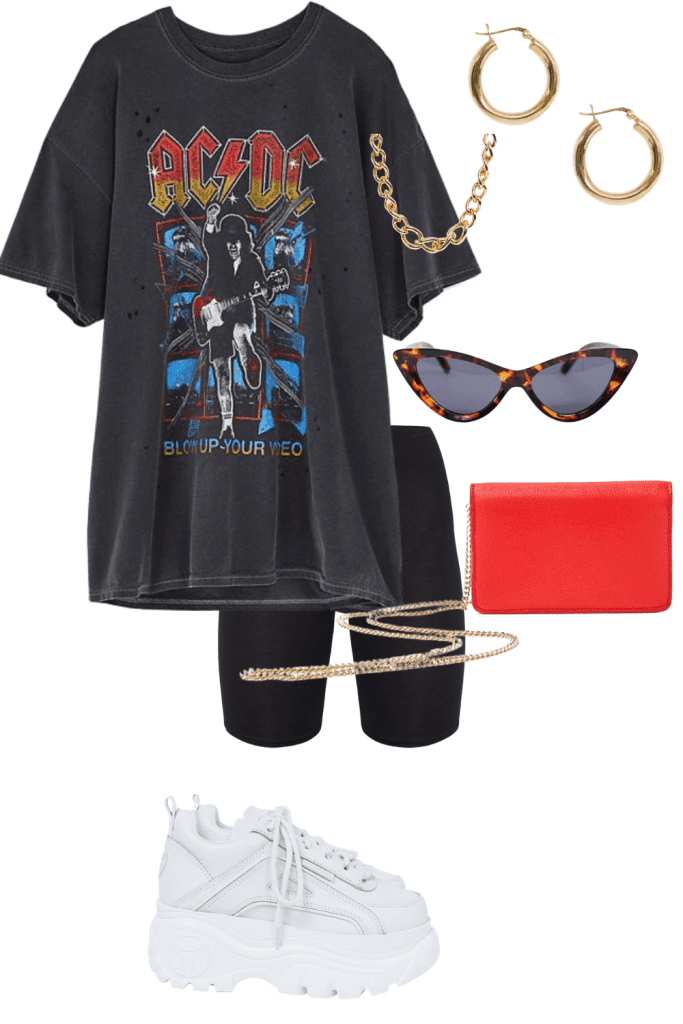
    Look #4Oversized Graphic Tee + Biker Shorts

    This is the one I’m sure you’ve seen the most, and this is the easiest. You could tie your shirt in the front with a couple accessories to make the look trendy and cute. 

    I hope you got some new outfit ideas from this post and maybe try biker shorts if you haven’t already. Check out the picture of me styling my biker shorts on Instagram so check it out! 

  • 3 Weight Loss Hacks that Actually Work

    3 Weight Loss Hacks that Actually Work

    How you can lose weight with hacks that actually work! My fitness journey goes like this… I was SKINNY my entire life. Even after childbirth I could eat the entire fridge and still be FINE. I live an active lifestyle because I’m in the Air Force but packed on some pounds after I injured my ankle and a whole lot of boo’ing up.

    During the holidays I attended a couples holiday vision board party. At the party a few of us gathered to take a picture. Afterwards I looked at that picture and was disappointed at the way I looked. I was looking like I ate the whole Thanksgiving turkey by myself *insert shocked face*.

    Weight loss wasn’t on my vision board but after that night I told myself that I wanted to start looking HAWT again!!! I want to have the time of my life without me being out of shape and hating the way I looked in photos.

    Initially my goal was to lose 10 lbs. Well I hit that goal and some. Now I’m pushing for some abs (At least 2 LOL!). In January 2020, I was 161 pounds looking like jelly cause jam don’t shake like that. April 2020 I was 144 pounds losing over 17 pounds. I was so excited. Currently (July 2020) I’m 148 pounds but as you can see from the pic I’m building more muscle and muscle weighs more than fat. One major key to documenting your weight loss journey is to take progress photos so you can see your progress. Looking at the scale can be very discouraging.

    Below are the 3 most important things I did to get results. If you’re looking for magic then stop reading now.

    Tip #1: Consistency

    If you want to see results with anything in life you have to be CONSISTENT. Taking a walk around the block for one week will not cut it folks. You have to stick to it for at least 30 days.

    Tip #2: Commitment

    You have to COMMIT to doing the work. Even if you miss a few days commit to getting back to your goals. Your spouse or your kids can’t do the work for you. It’s your temple so commit to taking care of yourself.

    Tip #3: Accountability

    Find someone to hold you accountable. A hype man or woman basically. My Beau will always be my hype man. When the gym was open we would workout together. However, your accountability partner doesn’t have to be in your city. My biggest accountability partner was my cousin and she lives alllllll the way in Michigan. We chat with each other all the time about our wins, slip ups and progress.

    Additional Important Tips

    Below are the detailed things I did to lose weight on my journey:

    FOOD – I eat about 3 meals per day and 2 healthy snacks. Grab your free meal plan HERE. I’m not a fan of fried foods but snacking was my weakness. You should also drink at least 32 ounces of water daily. You will notice how much more you will lose when you drink an adequate amount of water.

    EXERCISE – I exercise 3-5 times per week for at least 30 minutes. I have a gym membership but since COVID-19 shut down our gym I’ve been working out at home. Save your coins Chile! YouTube is your best friend for workouts. Just search for your skill level (ex. Beginner HIIT workouts). I also jump rope. Grab yours HERE.

    SUPPLEMENTS – I took TLC products – Detox Kit. You can grab your weight loss solution kit HERE. It includes Detox Tea, Nutraburst and Resolution drops. I’ll be the first to say I was skeptical at first but these products really work. 

    Remember that everyone’s body is different. Build eating habits and workouts that suit your lifestyle but most of don’t give up.

    If you are new to the LoveLee crew. Follow me on Instagram and check out my fitness highlight to catch me working out at home #nogymnoproblem. And make sure you stay tuned to my stories for more home workouts.

    Also, if you have any other questions about my weight loss journey, the food I eat, the products I use or need a virtual accountability partner send me an email at loveleelivininfo@gmail.com. I promise I don’t bite. 

    As always, Be Blessed!

  • 6 SECRETS TO PHONE PHOTOS | TIPS ON HOW TO TAKE GREAT PHOTOS WITH YOUR PHONE

    6 SECRETS TO PHONE PHOTOS | TIPS ON HOW TO TAKE GREAT PHOTOS WITH YOUR PHONE

    If you’re a blogger, content creator, social media influencer, or somewhere along those lines, then your best camera is the one you always have with you! Your iPhone!!! I will give you 6 secrets to capturing Instagram worthy photos with your phone.

    It’s a HASSLE and pricey to always having to hire a photographer.

    I mostly use my iPhone 11 (I don’t have the Plus) and it’s SO FREAKING EASY to take photos with that. I edit them on my phone, share to my blog, Instagram, and Facebook MUCH sooner from my phone. If I had to upload photos to my laptop, edit them, and airdrop them to my phone it would take too long.

    So let’s dive right in! I’m sharing my top 6 secret tips for getting great phone photos with your iPhone!

    #1 LIGHTING IS EVERYTHING!

    If you are inside, open up your curtains to let as much natural light come in.

    If you are outside have the sunshine behind your subject at 45 degrees.

    When you are outside while it’s cloudy you are pretty safe as far as lighting goes. You can avoid shadows by having your subject rotate until they don’t have under-eye shadows.

    #2 DON’T BACKLIGHT INSIDE

    When you are inside and want to take a photo/selfie, have your subject facing the window straight on or at an angle. If you have wrinkles you’re self conscious about, take photos facing the window straight-on.

    #3 CLEAN YOUR PHONE LENS

    Have you ever taken a photo and noticed that it was blurry or hazy? Perhaps it looked like you were taking a photo under water? That is a result of your camera lens being dirty. Also, in humid climates your lens can fog up when you go outside or come in from outside.

    You don’t have to do anything fancy to clean it. I just wipe it on my shirt and call it good.

    #4 EDIT YOUR PHOTOS IN THE LIGHTROOM MOBILE APP!

    I have tried many different apps to edit my photos (Facetune, VSCO, and more). However, Adobe Lightroom Mobile is my absolute favorite. I can edit my photos with the same settings by creating my own preset. The best part is the EFFICIENCY! It takes about 30 seconds to import, edit, and export a photo. I’ve been using my own collection of mobile presets for MONTHS, and I love how my photos look.

    #5 EDIT YOUR ORIGINAL PHONE PHOTOS

    Edit the photos on your phone using Adobe Lightroom. Make an album on your phone and save your photos to that album. DON’T SCREENSHOT THEM! When you take screenshots of photos you lose image quality. You can access your photo albums when you are importing images in the Lightroom mobile app.

    #6 USE PORTRAIT MODE

    Above the camera mode, you have a “portrait mode” which can be amazing. I love taking portrait mode photographs because it creates a shallower depth of field. Keep in mind, that this is a “boosted aperture mode” where you can control the aperture and have it as wide as f/1.4. Considering the cameras on the iPhone 11 Pro, none of them has the f/1.4 aperture.

    Hope these tips help you take great photos with your phone!